Theme Collections | Janine Krippner Photos
Theme collections are galleries not specifically related to volcanic hazards, processes, research, types, or features. This includes subjects such as different satellite platforms, astronaut photos from the Space Shuttle, specific photographers, or other special collections.
Image Gallery for Janine Krippner Photos
Photos by Janine Krippner. There are 48 images available.
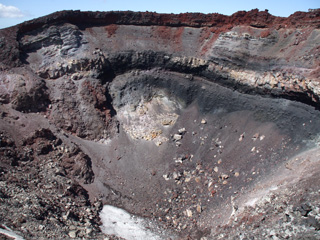
 Mayor Island (Tuhua) is the top of a 700-m-high volcano with a 3-km-wide caldera forming much of the surface. Lava domes and flows have been emplaced across the island, with those seen here interbedded with obsidian layers.
Photo by Janine Krippner, 2007.
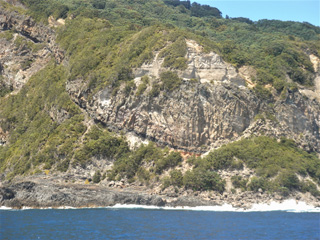
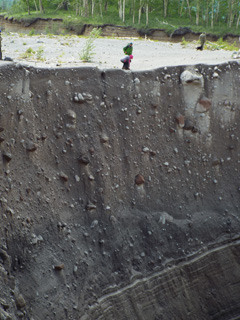
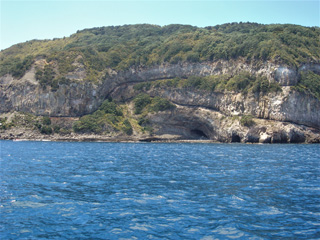 The eroded flank of Mayor Island (Tuhua) shows a sequence of overlapping columnar-jointed lava flows with black obsidian lavas between them.
Photo by Janine Krippner, 2007.
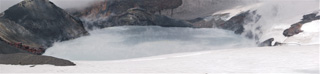 The Ruapehu Crater Lake is seen here on 4 March 2007 from the N, looking towards the tephra dam that failed on the 18th, resulting in 11% of the water draining through lahars down the Whangaehu valley on the E flank and down the N flank. The water temperatures fluctuate through time with geothermal activity below the lake.
Photo by Janine Krippner, 2007.
 The 25 September 2007 Ruapehu lahar that travelled down the Whangaehu Valley is seen here from the E two days later. The black deposit in the center includes two lahar descent paths that merged, and ash and mud deposits from the explosion that occurred within Crater Lake.
Photo by Janine Krippner, 2007.
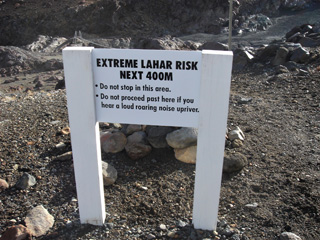 This “extreme lahar risk” sign is on the northern side of the Whangaehu valley on the E flank of Ruapehu with the September 2007 lahar in the background, the second lahar down this path that year. The bridge visible beyond the sign was damaged by the lahars.
Photo by Janine Krippner, 2007.
 The 25 September 2007 Ruapehu ice-slurry lahar emplaced the deposit across this photo, seen here two days later in the Whangaehu valley on the E flank. The path of the lahar from Crater Lake down the Whangaehu glacier is above it.
Photo by Janine Krippner, 2007.
 This snow-slurry lahar formed through brief explosions through the acidic Ruapehu Crater Lake, ejecting around 5,700 m3 of acidic water then entraining 60 times this volume in snow. This view looks up the Whangaehu valley towards the Crater Lake area two days after it was emplaced across the valley floor.
Photo by Janine Krippner, 2007.
 Surtseyan deposits from the 25 September 2007 Ruapehu eruption are seen here across Central Crater and the northern flank. In the lower part of the image is the ballistic apron, where blocks up to 2 m in diameter landed more than 2 km from their source. The northern flank lahar is to the lower right.
Photo by Janine Krippner, 2007.
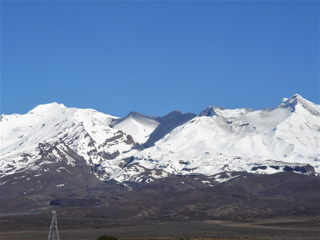
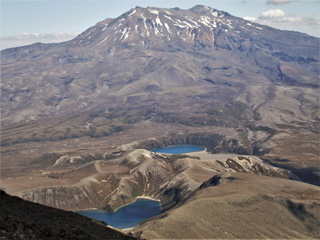 This 2008 view is from the Ngāuruhoe summit at Tongariro, to the south towards Ruapehu. In the foreground are the Upper Tama (foreground) and Lower Tama lakes, vents that predate formation of the Ngāuruhoe cone.
Photo by Janine Krippner, 2008.
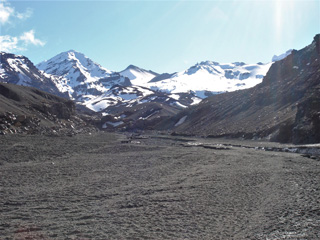
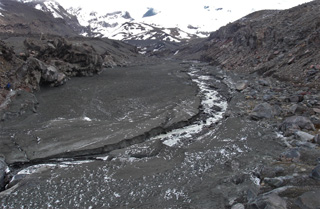
 The 25 September 2007 eruption of Ruapehu produced lahars on the N and E flanks from Crater Lake, with the E flank lahar seen here. Two lahar descent paths are visible, the wider one closer to the center down the Whangaehu Glacier, and the narrower path further to the left down the Whangaehu valley. The lahar merged and continued for 200 km along the Whangaehu River.
Photo by Janine Krippner, 2007.
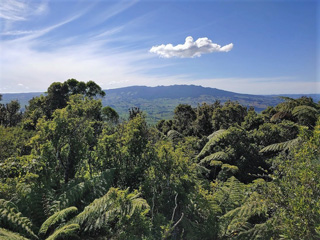 The western flank of the Pleistocene Maungatautari is seen here from Pirongia to the W in 2021.
 Photo by Janine Krippner, 2021.
 This 2008 view from the Ngāuruhoe summit (red scoria at the bottom) looks across Tongariro and to Lake Taupō in the distance. Within Tongariro going in a clockwise direction, South Crater is in the foreground, North Crater is to the upper left, Blue Lake is to its right, and Red Crater is below it.
Photo by Janine Krippner, 2008.
 This view from the Ngāuruhoe summit to below the SW flank shows the lava flows emplaced during the 1954-55 eruption, down the Tongariro flank and around the eroded Pukekaikiore cone. They overlie older lava flows from the same vent.
Photo by Janine Krippner, 2008.
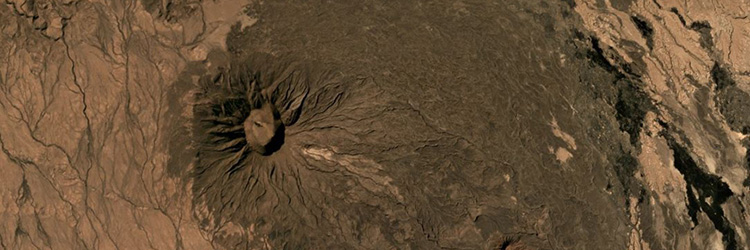
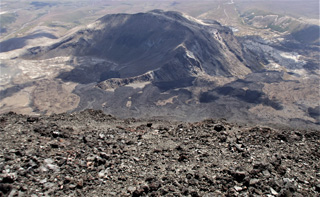
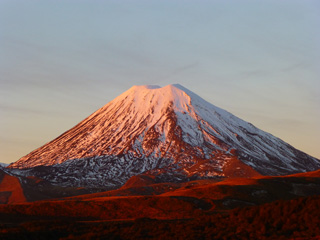
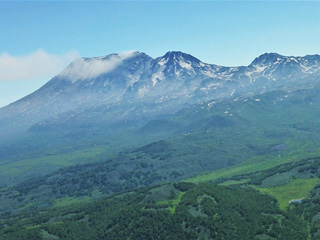
 The scoria cone within the Ngāuruhoe summit crater largely formed during the 1954-55 eruption and was the location of the 1974-75 eruption, seen here from the larger crater rim to the E. The Ngāuruhoe cone is at the southern end of the Tongariro volcanic complex and is one of the youngest features. Taranaki is to the W, visible in the distance.
Photo by Janine Krippner, 2008.
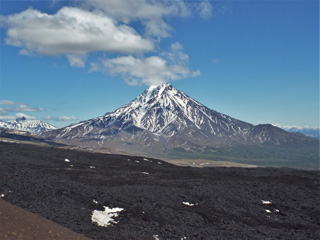
 The Ngāuruhoe cone reaches around 900 m above the Tongariro volcanic complex. Seen here from the W in 2012, the summit scoria cone mostly formed in 1954-55 within the larger summit crater area. The older crater rim is on the right side of the summit in this view.
Photo by Janine Krippner, 2012.
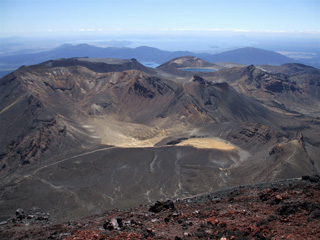
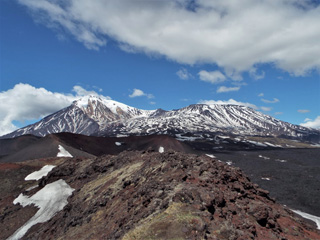
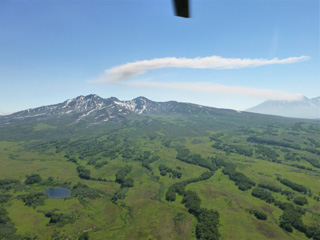
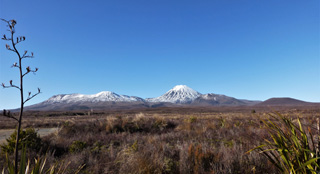 Eruptions of the Tongariro have occurred across at least 12 vents, with the western flank of the complex seen here in 2012. From left to right are the broad North Crater, the Ngāuruhoe cone, Pukekaikiore, and Pukeonake. Eruption deposits and material that has eroded from the edifice forms the plain in the foreground.
Photo by Janine Krippner, 2012.
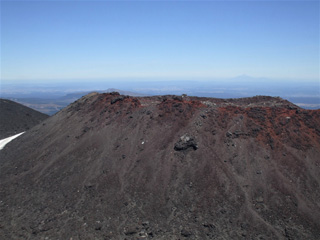
 The crater of the Ngāuruhoe scoria cone is seen here from the NW rim on 8 February 2008. The cone formed mainly through a series of Strombolian and Vulcanian eruptions in 1954-55, with the red uppermost scoria unit emplaced in 1974-75.
Photo by Janine Krippner, 2008.
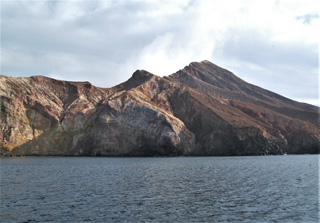 This 22 August 2005 photo shows the E side of the Whakaari/White Island Central Cone showing the exposed stratigraphy of tuff, lava, and breccia units. The gas-and-steam plume rising from the active vent is visible above the flank.
Photo by Janine Krippner, 2005.
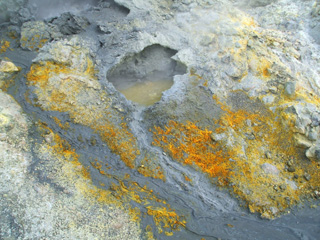 Whakaari/White Island has an active hydrothermal system that produces hot springs, fumaroles, mud pools, and acid streams and lakes. A sulfur-rich hot spring is shown here with extensive mineralization across the surrounding surface.
Photo by Janine Krippner, 2005.
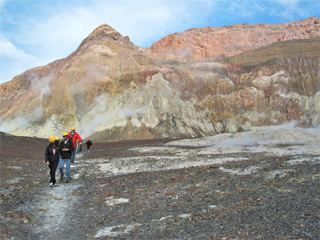 Tourists walk across the Whakaari/White Island crater floor in August 2005. The crater wall behind them is composed of lavas, breccias, and tuff deposits.
Photo by Janine Krippner, 2005.
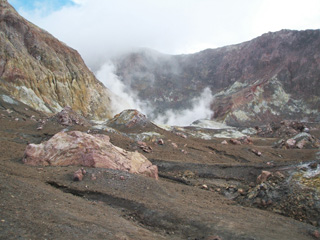 This photo looks towards the western crater lake at Whakaari/White Island, which is emitting volcanic gases and steam. The crater walls expose lavas and tuff deposits, and across the central crater floor (foreground) are blocks and hummocks of the 1912 debris avalanche deposit.
Photo by Janine Krippner, 2005.
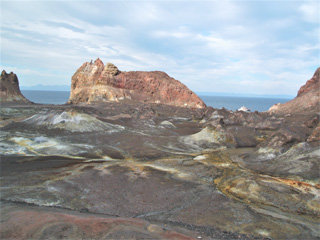 This August 2005 looks across the Whakaari/White Island Eastern Crater towards Troup Head. Across the crater floor are hummocks, 1-3 m high, from the 1914 debris avalanche and hydrothermal alteration products.
 Photo by Janine Krippner, 2005.
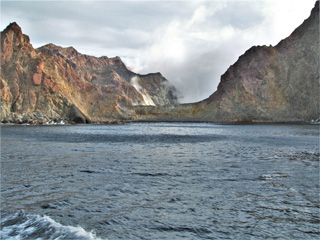 This August 2005 view is looking into the Whakaari/White Island crater through Wilson Bay at the SE of the island. Steam and gases are rising from the crater lake at the far end of the crater, as well as from fumaroles along the crater rim. The units exposed in the inner and outer walls are variably weathered and oxidized lavas, tuffs, and breccias.
Photo by Janine Krippner, 2005.
 The eroded W flank of Udina is seen here beyond the 2012-13 Tolbachik lava flow. The smaller Malaya Udina is on the opposite side of the cone.
Photo by Janine Krippner, 2015.
 The main Tolbachik edifice is seen here from one of the southern flank scoria cones, with the Ostry peak to the left and the broader Plosky to the right. The 2012-13 lava flow is to the lower right of the scoria cones.
Photo by Janine Krippner, 2015.
 Once the lava began to drain from a 2012-13 Tolbachik lava tube the dripping lava formed these structures on the ceiling, with minerals forming across the surfaces.
Photo by Janine Krippner, 2015.
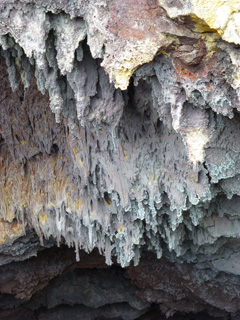
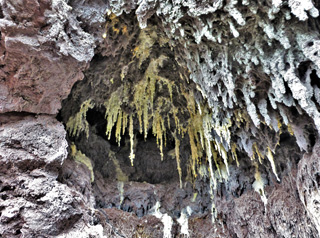 These lava stalactites formed in a lava tube within the 2012-2013 Tolbachik lava flow field, seen here in 2015. When the lava drains through the tubes remnants drip from the ceiling. Yellow and white minerals have crystalized across the surfaces.
Photo by Janine Krippner, 2015.
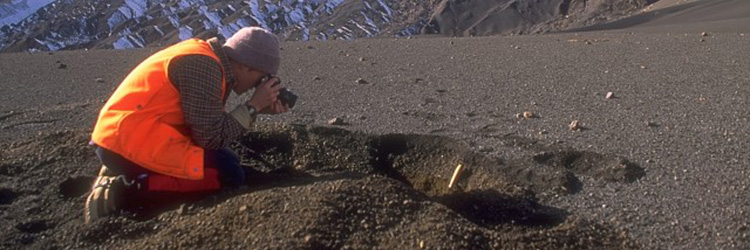
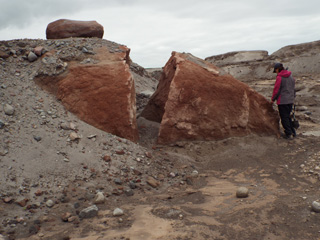
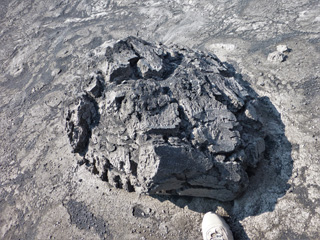
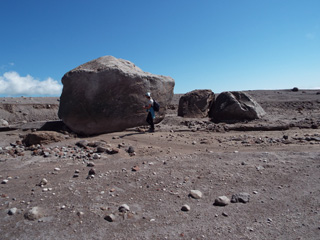 This boulder was part of the lava dome at Sheveluch before a collapse produced the 27 October 2010 block-and-ash-flow that emplaced it 13 km away. The hot dome rock fragmented as it travelled, producing a large amount of ash with a large range of block sizes within the ash matrix.
Photo by Janine Krippner, 2015.
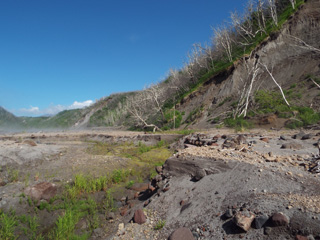 The trees along the Baidarnaya river channel walls in this 2015 view towards the W were killed by the October 2010 block-and-ash flow, around 14 km from the lava dome where the flow originated. By the time this photo was taken, extensive erosion had occurred through the deposit across the channel floor.
Photo by Janine Krippner, 2015.
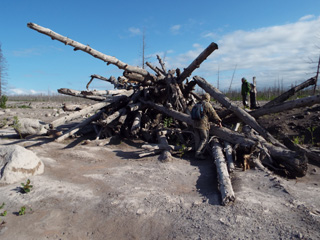 The trees in this dam were entrained by the 27-28 February 2005 block-and-ash flow and emplaced over 13 km from the dome, near the end of the deposit. The flow destroyed around 10 km2 of forest and emplaced material reaching over 20 m thick in places.
 Photo by Janine Krippner, 2015.
 This section within the Sheveluch the block-and-ash flow deposit from 27-28 February 2005 was exposed by the new Baidarnaya river channel along the northern edge of the deposit. The deposit is composed of fragmented lava dome rock and overlies older laminated deposits, seen here in July 2015.
Photo by Janine Krippner, 2015.
 This July 2015 photo looks across the 2010 Sheveluch block-and-ash flow towards the 1964 debris avalanche deposit. Klyuchevskoy (left) and Ushkovsky (right) are in the background, with a gas plume emitting from the former. The section of deposit in the foreground is darker because of cloud cover.
Photo by Janine Krippner, 2015.
 This large boulder is dome rock that was carried by and emplaced within the 27-28 February 2005 Sheveluch block-and-ash flow, 15 km away from its source. It has been exposed in an eroded channel, surrounded by highly fragmented dome remnants.
Photo by Janine Krippner, 2015.
 This 6 July 2015 photo of Sheveluch is from the Baidarnaya river channel to the SE. The higher edifice to the right is Old Sheveluch, and the rest of the edifice shown here is “Young Sheveluch”. An ash plume is rising from the lava dome, seen beyond the 1964 collapse scarp.
Photo by Janine Krippner, 2015.
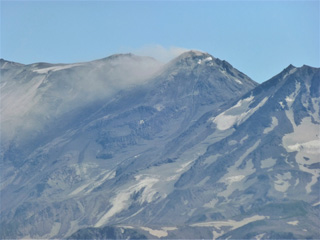
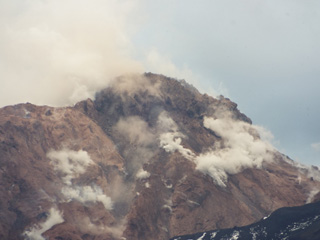 This closeup view of the eastern flank of the Sheveluch lava dome shows degassing across the surface on 6 July 2015. In the lower right is the top of the 1964 flank collapse scarp that encloses the dome.
Photo by Janine Krippner, 2015.
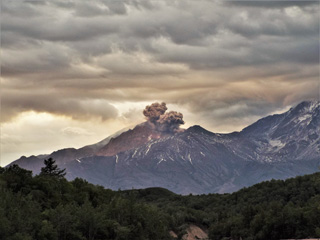
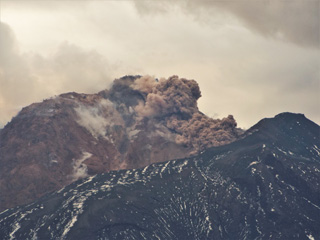 An avalanche descends the NE flank of the Sheveluch lava dome on 6 July 2015, seen above the 1964 flank collapse scarp rim. Fragmentation of the hot dome rock produces the beginning of an ash plume above it and degassing is also visible across the dome.
Photo by Janine Krippner, 2015.
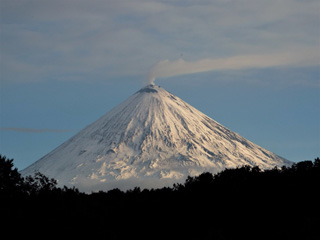 The northern flank of Klyuchevskoy is seen here on 8 July 2015. A gas-and-steam plume is emanating from the summit crater and is dispersed to the W by the wind.
Photo by Janine Krippner, 2015.
 Thick lava flows from Karymsky have been emplaced down the flanks and have partly infilled the Karymsky caldera. The NW caldera wall is seen here in 2014, with oxidized deposits from the older cone exposed.
Photo by Janine Krippner, 2014.
 This breadcrust bomb was ejected from the Karymsky crater and landed below the SW flank some time before 2014. When it was erupted it was still molten and expanding in the center, causing the cooled, solidified crust to crack apart to form this typical structure.
Photo by Janine Krippner, 2014.
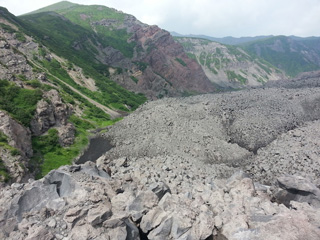
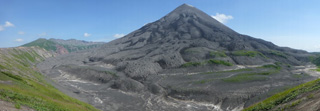
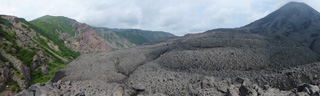 This July 2014 photo shows the lava flows across the SE lower flank of Karymsky, with the Karymsky caldera wall to the left. The caldera formed around 7,700 years ago and has been filling with lavas and other deposits from the cone since around 5,300 years ago. Lava flows within the caldera reach 80 m thick in the SE part.
Photo by Janine Krippner, 2014.
 A hot spring on the southern caldera rim of Akademia Nauk is ejecting water and steam/volcanic gases on 19 July 2015 within a broader geothermal area. Geologists are behind the plume for scale.
Photo by Janine Krippner, 2014.
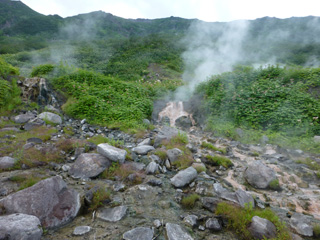 Geothermal activity occurs along the southern rim of the Akademia Nauk caldera, above the Karymsky lake. This 19 July 2014 view shows gas emissions from several areas, and geothermal fluids from a hot spring.
Photo by Janine Krippner, 2014.
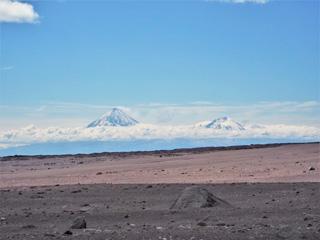
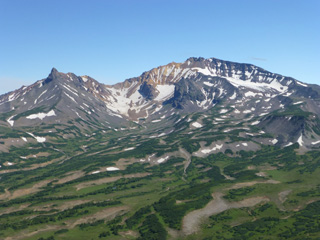
 Dzenzursky is an extensively eroded, largely Pleistocene edifice in Kamchatka. Zhupanovsky is to the E, seen in the background emitting a gas plume towards the left.
Photo by Janine Krippner, 2014.
 The extensively eroded western flank of Dzenzursky is seen here. The majority of the edifice formed during the Pleistocene.
Photo by Janine Krippner, 2014.
 The Pleistocene Zhupanovskiye Vostriyaky is shown here from the N with Zhupanovsky in the background to the right on. A gas plume is emanating from the Priemysh cone and is being dispersed N then W.
 Photo by Janine Krippner, 2014.
 This 22 July 2014 photo of Zhupanovsky shows the Priemysh cone emitting a gas plume, seen here from the N. This cone has been active since the early Holocene and has been the site of many of the recent eruptions. The Bastion cone is to the right.
Photo by Janine Krippner, 2014.
 Zhupanovsky has four large edifices that form a WNW-trending ridge, with the active Priemysh cone emitting a gas plume towards the N, which was then redispersed to the W across this image. The older Zhupanovsky peak is to the left and the Bastion edifice is to the right.
Photo by Janine Krippner, 2014.
 The flanks of Karymsky are composed of thick lava flows that have infilled the Karymsky caldera, seen here in 2014. The NW caldera rim is to the left.
Photo by Janine Krippner, 2014.